
Recording Drums With Dan Sugars!
- LevelsMusic
- Oct 7, 2018
- 3 min read

As I mentioned in my previous blog, I had the absolute pleasure to be able to record drums with one of the most talented drummers I've ever seen - Dan Sugars!
Although I was assigned to the console and patch bay (which wasn't needed in the end) for most of the day, this session was still a huge refresher for me as recording drums of all instruments is something I do very rarely as an EDM producer (cop them samples boi). This is not to say however, that I was completely unaware as to how to record drums as I spent a lot of time around and micing them in my days at 4ZZZ Radio.
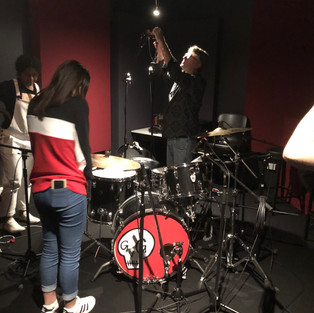
Dan Sugars in the Audient B Studio Live Room at SAE Institute Brisbane - Photos taken by yours truly on the 5th of October 2018 ;)


Mic techniques
Compared to your usual drum setup, this one wasn't much different apart from a few things.
Ribbon Overheads - blumlein
This one was a first for me and quite interesting to say the least as I am usually used to the standard spaced pair pencil condenser setup for live broadcasting/recording. In comparison, this setup was significantly different as it was using two ribbon microphones both set to a figure 8 polar pattern facing each other in an 'X'-like direction capturing both the overheads and also a small amount of the room sound reverberating off the ceiling. This technique is definitely something I'll be taking with me into the recording of Kevin Barber's EP as the sound these microphones gave off was absolutely stunning.
The kick drum cave
As you can see in the images above, there is a little cubby house-like cave out the front of the drum kit. This is a blanket draped over the mic stands to help isolate the kick drums main output (being the front). Yet again, this is also a technique I have never seen used before but this one also astounded me as we managed to capture a very solid and punchy kick from the kit. Having this isolation really helped with blending with kick in and out signals together to create a really nice, solid sound but not one that was too overbearing for the romantic and chilled song he was playing to.
Pencil Condensers on the snare - top and/or bottom?
Now this is where the setup got a bit dodgy for us as we didn't exactly think it all the way through as to just how sensitive the microphones we would be using (Neumann KM184's) were. That combined with the instrument we were using it on wasn't exactly ideal as the snare is probably the most snappy and powerful part of the kit in terms of micing. This lead to our gain staging being relatively all over the place as gaining these mics was basically impossible without clipping them really hard. However, the mic we used on the bottom of the snare didn't have anywhere near as much of a reaction and actually gave off a relatively nice tone. As an alternative to the pencil condenser on the top of the snare, we strapped a Rode M3 to the top of it to get another signal that we could potentially blend with the pencil condenser in the end to get a nice snappy sound, which we did. Another great benefit of having an M3 strapped to the top of the condenser was the fact that it basically acted as a shield in case Dan accidentally hit it. Looking back now I'm relieved that we did have it there because if that condenser was hit, it could've caused serious damage and that's $1000 we don't have to replace it...
Running the console
Admittedly, this is something I could have done a bit better although with the use of only a very small 8 inputs, our micing was rather limited. This also affected our routing on the desk as at the beginning of the session as there were a lot of inputs being changed and routed to different places but no one physically switched the cables in the live room resulting a bit too much of a hot mess on the desk for my liking. I wound up losing track of certain inputs every now and then but thats mainly due to my loss of concentration after being in studio for almost 6 hours straight. Other than this, the Audient 4816 console is rather simple to run and it was great fun to mix and blend different mic signals together to create specific sounds for certain instruments!
TO finish
The next blog to come for you guys will be all about my latest gigging experiences as a DJ! I know, its been a while since I wrote about DJing instead of producing so stay tuned! Until next time!
Levels :)

Comments